Context Menus in OpenInsight 10 – Part I
- They could only be attached to a control programmatically, rather than via the Form Designer.
- The context menu designer tool would name a menu based on the control it was supposed to be attached to – there was no real concept of sharing a menu between controls.
- They were limited to a single level – no sub-menu nesting was allowed.
- They were difficult to modify at runtime.
These issues made them quite onerous to use, which is unfortunate as context menus are an important part of modern UI design, having been in widespread use across the OS since Windows 95.
With version 10 we went back to the drawing board and completely redesigned them to make them first class UI citizens and solve the problems outlined above.
The Context Menu Designer
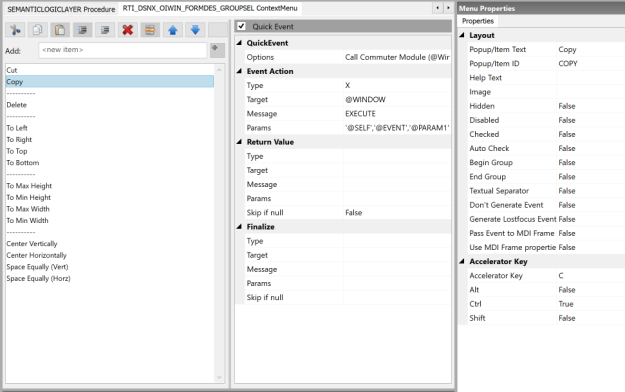
One of the new tools in the IDE is the Context Menu Designer, which allows you to define the structure of the menu along with any quick events (Event scripts are not supported for context menus).
Menus saved by the designer are given simple names in the same format as any other repository entity – they are no longer based on the name of a specific control. They can then be attached in the Form Designer by using an object’s CONTEXTMENU property.
(Note that like normal WINDOW menus they also support nested structures as they share the same code-base.)
The CONTEXTMENU property
Forms and controls now support an explicit CONTEXTMENU property which is the repository ID of a saved context menu.
At runtime, when a user right-clicks on a control, the Presentation Server looks at the CONTEXTMENU property to find the name of an attached menu, and, if found, displays it.
When the user selects an item from context menu a MENU event is raised and sent to the quick event target defined in the designer.
This is a much simpler and streamlined process.
Of course, that’s not the end of the story as there are times when the context menu will need to be adjusted before it is displayed at runtime, depending on factors like the state of it’s parent control and so on. We’ll take a look at how to do that in the next post.
(Disclaimer: This article is based on preliminary information and may be subject to change in the final release version of OpenInsight 10).


